Creating an API serving CoreML results

Machine Learning is the future, and for iOS developers that future is packaged with something called CoreML. In this post we're trying to setup an API using Vapor which will serve us the CoreML results.
Using CoreML
Build intelligence into your app by adding CoreML to it, it can help you recognize shapes, images, depth and much more. This can improve your app immensely, but it also comes with some downsides. A CoreML library can increase the binary size of your app rapidly; it will also require a new app release each time you improve your model. This can be painstaking and annoying to do. A nice way of solving this would be by using an rest API, which is common for many apps and the app you are working on might already have support for it… the problem is, CoreML doesn’t have support for it. So, how can we solve this?
In this post we’re going to try to solve this by setting up a rest API and trying to have it classify images using’s Apple Image classification model.
Requirements
Before you scroll to the end of this article and try to download the source and push it to heroku… there are some thing you need to keep in mind. First and foremost, you need to run the api on MacOS. E.g. you can set this up on an old MacBook you have laying around? Maybe you already rent a server with MacOS? Because we need to use the CoreImage framework as well as CoreML and Vision frameworks, we need to run it on MacOS… running it on Linux won’t work.
Also, if you have done some Vapor before, it’ll help a lot.
1. Installation
If you have Vapor already installed, you skip this section.
Make sure Xcode installed on your system, if not download it and while installing, start by going to Vapor.codes and read their getting started documentation. Once installed, install Homebrew, followed by installing Vapor using the following command:
brew tap vapor/tap
brew install vapor
Now that you have Vapor installed, we can continue to setting up your project.
2. Setup new project
Now that you have vapor installed, you can setup your new project. Because we will be using the SqueezeNet model from Apple later on, lets call our API the SqueezeNetAPI. Open a terminal window, go to the location you wish to create your project and write the following:
vapor new SqueezeNetAPI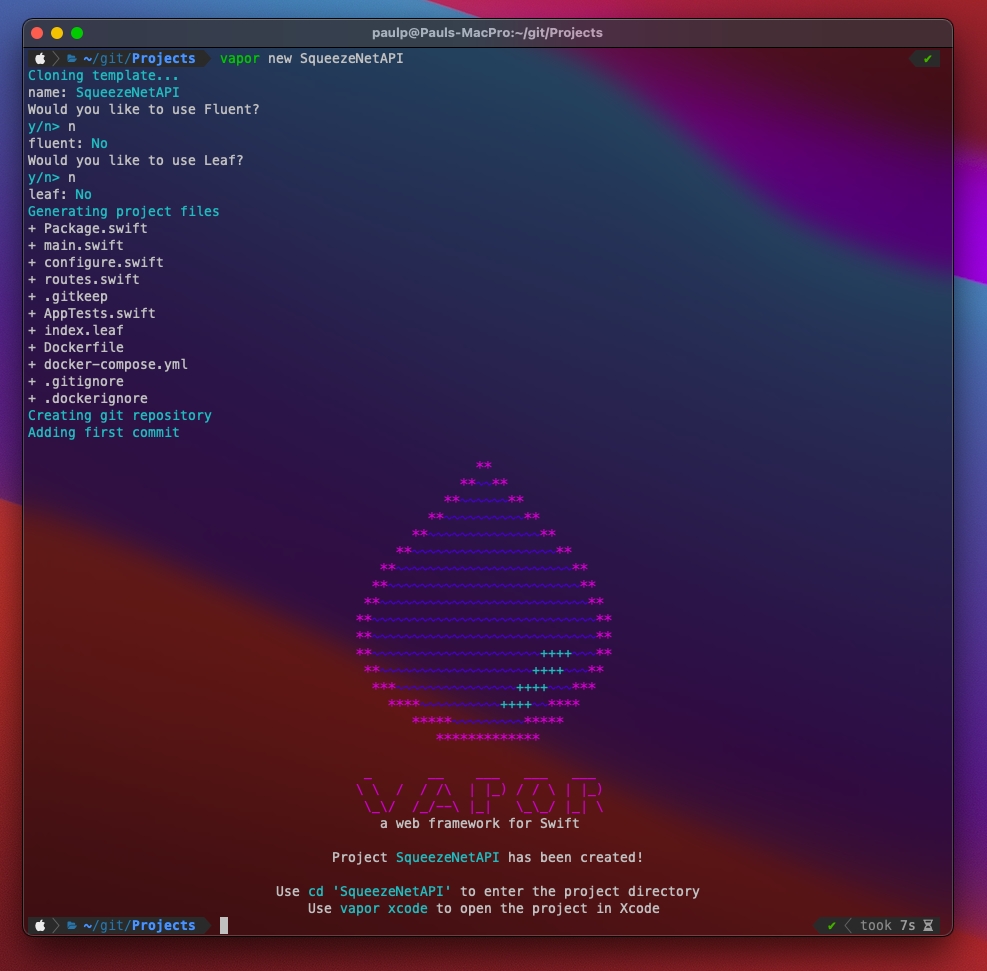
Once completed, you will have a new folder called SqueezeNetAPI. Enter the folder and launch the project in Xcode:
cd SqueezeNetAPI
vapor xcode
Xcode will open the project and start downloading the dependencies for the project, defined in the Package.swift file. There is no Xcode project file or workspace; vapor uses the Package.swift file for using Swift Package Manager. Details about the vapor structure of the project can be found here and here.
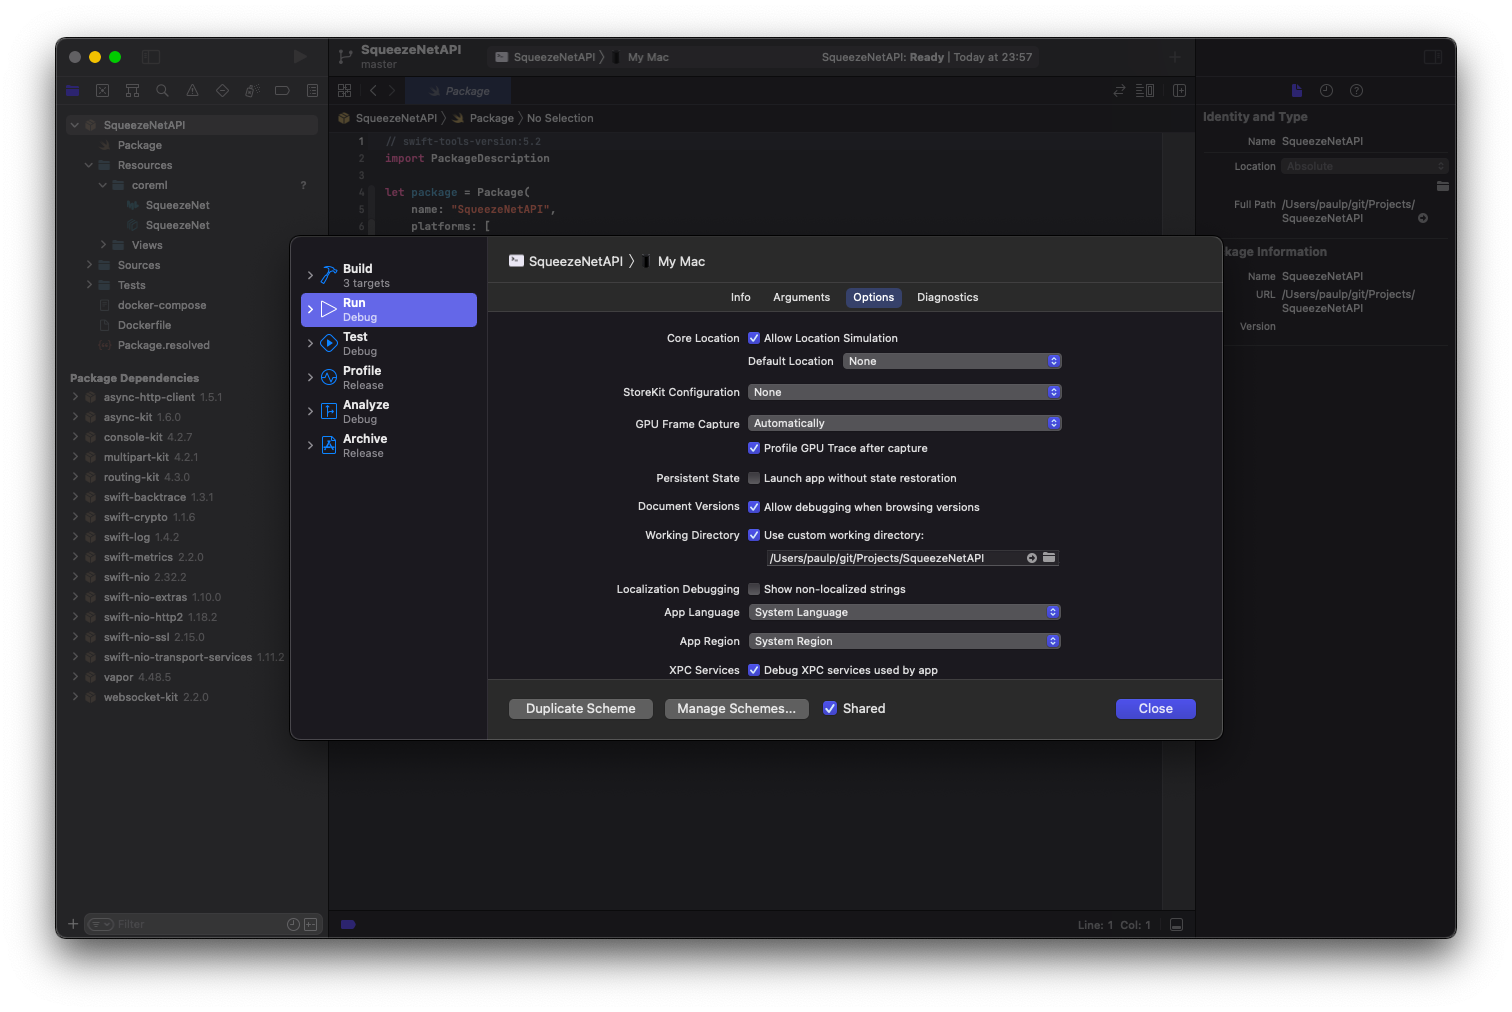
Once done, we need to change the working directory for the project. To do so, open the Edit Schema view in Xcode and select the Options tab under Run. You can open this view via the menu Product > Scheme > Edit scheme, or selecting Edit Scheme from run target selection (see image), or using the keys ⌘ Command + <.
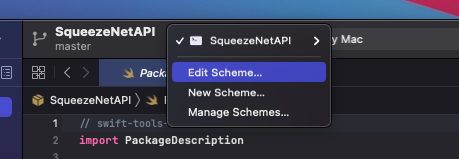
Select Use custom working directory to enabled and select the root of your project as target.
3. Adding and compiling the CoreML model
Before we write code, lets add the CoreML model. Start by visiting Apple’s Core ML models website for downloading the model called SqueezeNet.
In your SqueezeNetAPI project folder, there is a folder called Resources, open this folder and inside create a new folder called coreml. Place the SqueezeNet.mlmodel you’ve just downloaded inside this folder and return to your terminal.
Since this issn’t an iOS or MacOS project, we can’t just drag and drop the mlmodel file into our project and run it normally, instead we need to compile the model ourselves. First off, let’s compile the mlmodel to a binary format which we can include into our project. Go back to your terminal and while in the root of our project, run the following command:
xcrun coremlcompiler compile Resources/coreml/SqueezeNet.mlmodel Resources/coremlOnce completed, a set of new files will have been created in the same location and the mlmodel was stored. If you look in Xcode, your folder structure should now have two “files” called SqueezeNet

Now that this is done, we need to generate the source code to this interface. Back in the terminal, execute the following command:
xcrun coremlcompiler generate Resources/coreml/SqueezeNet.mlmodel --language Swift Sources/App/This will generate a file called SqueezeNet.swift inside Sources/App/. This is the file we’re later going to use with our model.
4. Adapting the CoreML file
Now that we have our model included in the project as well as the source code to it, we need to adapt it. In Xcode, open the file called SqueezeNet.swift.
In the top of the file, add the import of Vapor like so:
import VaporThereafter go to the definition of urlOfModelInThisBundle, at line 104.
Here we need to change how we are going to load our model. In Vapor, we don’t access files using our bundle, but instead we use something called DirectoryConfiguration. Change this method to the following:
class var urlOfModelInThisBundle : URL {
    let directory = DirectoryConfiguration.detect()
    return URL(fileURLWithPath: directory.workingDirectory)
        .appendingPathComponent("Resources/coreml/SqueezeNet.mlmodelc",
                                isDirectory: true
        )
}
What this will do is that it will access the compiled mlmodelc at the correct location when we need it.
If you like, you can now run the project and in safari you can browse to http://localhost:8080/hello. You will now see a Hello, world! page of you project.
5. Adding our first route
The Hello, World! page is all fun and games, but this is not really what we want. What we want to do is have a REST api which will take an image and returns a image classification for said image. Let’s call this a “Classification”.
Back in Xcode, we will start off by browsing to Sources > App > Controllers and adding a new file here. Call this file ClassificationController.swift and give it the following content:
import Vapor

struct ClassificationController: RouteCollection {
    func boot(routes: RoutesBuilder) throws {
        routes.on(.POST,
                  "classify",
                  body: .collect(maxSize: ByteCount(value: 2000*1024)),
                  use: classification
        )
    }

    func classification(req: Request) throws -> String {
        return "Success"
    }
}
Now we have added a routeCollection. There are multiple ways of handing routes, this is one of them. We have now create a way for us the gather all classification related routes to one controller called the “ClassificationController”. Right now it will handle one route, which is /classify for POST requests. It will also allow it to send in a body with a max size of ~2mb.
In order to get this route collection to work, we need to change the routes.swift file. Lets open the files routes.swift and exchange the func routes(_:) throws func to the following:
func routes(_ app: Application) throws {
    try app.register(collection: ClassificationController())
}
Now you can make a post request to http://localhost:8080/classify which will return you the text Success when finished.
5.1 Accepting a file
In order for us to classify an image, we need to actually be able to send one in. Lets create a folder in Sources > App called Models and add a new file called ClassifyRequest.swift to it. Give ClassifyRequest.swift the following content:
import Vapor

struct ClassifyRequest: Content {
    let image: File
}
Back in ClassificationController, add the following code to the classify route:
let classificationRequest = try req.content.decode(ClassificationRequest.self)
let image = classificationRequest.image
let data = Data(buffer: image.data)
Now we can get the Data from the file you have send in using curl.
6. Setting up the Image Classifier
Under Sources > App, add a new file called ImageClassifier.swift and give it the following content:
import Vapor
import CoreML
import Vision
import CoreImage

enum ImageClassifierError: Error {
    case nothingRecognised
    case unableToClassify
    case invalidImage
}

struct ClassificationResult: Content {
    let identifier: String
    let confidence: Float
}

class ImageClassifier {
    typealias classificationCompletion = ((Result<[ClassificationResult], ImageClassifierError>) -> Void)
    private var completionClosure: classificationCompletion?

    lazy var request: VNCoreMLRequest = {
        let config = MLModelConfiguration()
        config.computeUnits = .all

        do {
            let model = try VNCoreMLModel(for: SqueezeNet(configuration: config).model)
            let request = VNCoreMLRequest(model: model, completionHandler: handleClassifications)
            request.imageCropAndScaleOption = .centerCrop

            return request
        } catch {
            fatalError("Failed to load the model. Error: \(error.localizedDescription)")
        }
    }()

    func getClassification(forImageData imageData: Data, orientation: CGImagePropertyOrientation, completion: @escaping classificationCompletion) {
        guard let ciImage = CIImage(data: imageData) else {
            completion(.failure(.invalidImage))
            return
        }

        completionClosure = completion

        let handler = VNImageRequestHandler(ciImage: ciImage, orientation: orientation)
        do {
            try handler.perform([self.request])
        } catch {
            print("Failed to perform classification.\n\(error.localizedDescription)")
        }
    }
}

private extension ImageClassifier {
    func handleClassifications(forRequest request: VNRequest, error: Error?) {
        guard
            let results = request.results,
            let classifications = results as? [VNClassificationObservation]
        else {
            debugPrint("Unable to classify image.\n\(error!.localizedDescription)")
            completionClosure?(.failure(.unableToClassify))
            return
        }

        if classifications.isEmpty {
            completionClosure?(.failure(.nothingRecognised))
        } else {
            let topClassifications = classifications.prefix(2)
            let results = topClassifications.map { classification in
                ClassificationResult(identifier: classification.identifier, confidence: classification.confidence)
            }
            completionClosure?(.success(results))
        }
    }
}
I’m not going too much into detail about what this class does, there are great tutorials out there on Image Classification as well as Sample projects from Apple which you can download and checkout out; however the gist of this class is that it’ll take a CIImage with orientation and sends it in into our model for classification. It will then take out the top classifications and return those as an array.
This file will also define the struct ClassificationResult which we will use for the return data.
7. Returning the classification
Now that we have the image classifier class in place, we must update the route to actually call it. In order to do so, lets update our ClassificationController.swift’s route to the following:
func classification(req: Request) throws -> EventLoopFuture<[ClassificationResult]> {
    let eventLoop = req.eventLoop.makePromise(of: [ClassificationResult].self)

    let request = try req.content.decode(ClassifyRequest.self)
    let image = request.image
    let data = Data(buffer: image.data)
    guard let orientation = CGImagePropertyOrientation(rawValue: 0) else { throw Abort(.internalServerError) }

    imageClassifier.getClassification(forImageData: data, orientation: orientation) { result in
        switch result {
        case .success(let classificationResults):
            eventLoop.succeed(classificationResults)
        case .failure(let error):
            eventLoop.fail(error)
        }
    }

    return eventLoop.futureResult
}
The changes we made here is that we changed from a return value of String to an EventloopFuture, this will promise that the function will eventually return something of type [ClassificationResult], which in turn conforms to Content which is something Vapor will be able to translate to JSON. See Content as a Codable on iOS.
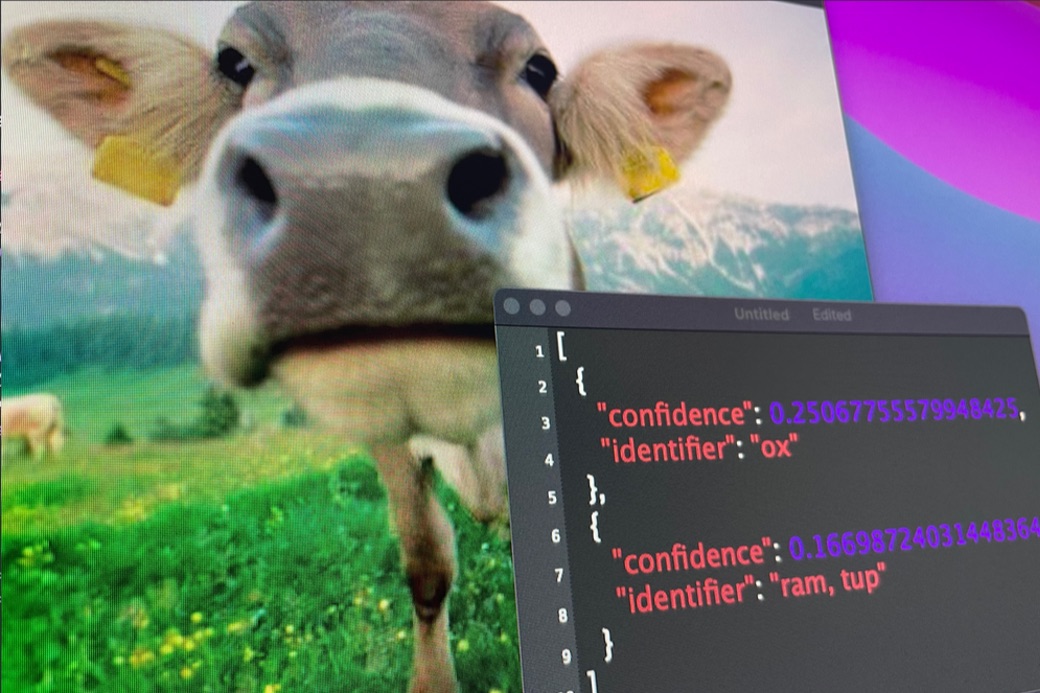
If you now run this project and go to the terminal and fire the same curl command as last time, you should see the following result for this picture:
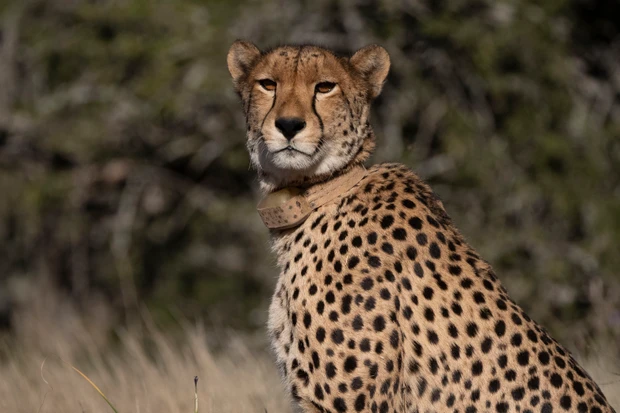
$ curl --form image='@cheetah.png' http://localhost:8080/classify
[{"confidence":0.99956685304641724,"identifier":"cheetah, chetah, Acinonyx jubatus"},{"confidence":0.00034059779136441648,"identifier":"jaguar, panther, Panthera onca, Felis onca"}]
Voila! Now you have your vapor project return an CoreML classification!
8. Known issues
There are a few known issues. The ones I can come up with are listed here:
Orientation
As you might have noticed, we’re setting a hard-coded orientation. Since we don’t have support for UIImage on this platform (UIKit is not supported), we can’t get the image orientation from the image. Maybe this is possible in CIImage or CGImage, I haven’t checked (yet). Otherwise, if you can have the client send in an orientation which you map to CGImagePropertyOrientation.
JPEG support
Some JPG/JPEG images won’t work for me, especially if they are of a large size. Whenever I send a JPG image, I sometimes get the error:
HWJPEG not available on this platform9. Sourcecode project
A tutorial like this wouldn’t be complete without the finished source. However, due to copyright reasons the CoreML model is not included. Download this from here and follow the steps mentioned above.
You can clone this project from my public repository here: https://github.com/ppeelen/SqueezeNetAPI